
If you are a Mac user, you may have noticed that some files are hidden from view by default. This is a security measure implemented by macOS to prevent users from accidentally deleting or modifying important system files. However, in some cases, you may need to access these hidden files for troubleshooting, customization, or other purposes. In this article, we will discuss how to view hidden files on a Mac.
Method 1: Use Terminal to View Hidden Files
The Terminal app is a powerful tool that allows you to interact with your Mac using command-line commands. One of the things you can do with Terminal is to view hidden files. Here’s how:
- Open Terminal: You can find the Terminal app in the Utilities folder inside the Applications folder, or you can use Spotlight to search for it.
- Enter the command: Type the following command in Terminal and press Enter:
defaults write com.apple.finder AppleShowAllFiles true- Restart Finder: To apply the changes, you need to restart the Finder. You can do this by entering the following command in Terminal and pressing Enter:
killall Finder- View hidden files: Once you’ve restarted Finder, you should be able to see hidden files and folders in Finder. To hide them again, simply repeat the process and replace “true” with “false” in the first command.
Method 2: Use a Third-Party App to View Hidden Files
If you don’t want to use Terminal or prefer a more user-friendly solution, you can use a third-party app such as Funter to sview hidden files on your Mac. Here’s how:
- Download and install Funter: You can download Funter for free from the developer’s website.
- Launch Funter: Once you’ve installed Funter, launch it from your Applications folder.
- Enable “Show hidden files”: In Funter’s preferences, click on the “Show hidden files” checkbox to enable it.
- View hidden files: Once you’ve enabled this option, you should be able to see hidden files and folders in Finder. To hide them again, simply uncheck the “Show hidden files” checkbox in Funter’s preferences.
You can also use TinkerTool, a third-party utility that allows you to access hidden features and settings on your Mac. It provides easy access to advanced preferences and settings that are not available through the System Preferences menu. With TinkerTool, you can enable and disable system-wide features, modify the appearance of the Finder and Dock, and even access hidden files and folders.
How to Download and Install TinkerTool TinkerTool is available as a free download from the developer’s website. To install it, simply follow these steps:
- Go to the TinkerTool website and download the latest version of the app.
- Double-click the downloaded file to extract the app.
- Drag the TinkerTool app to your Applications folder.
Using TinkerTool to view Hidden Files on a Mac Once you have installed TinkerTool, you can use it to reveal hidden files and folders on your Mac. Here’s how:
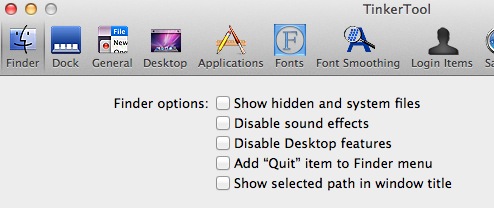
- Launch TinkerTool from your Applications folder.
- In the left-hand pane, click on the “Finder” tab.
- Check the box next to “Show hidden and system files.”
- Close the TinkerTool window.
Now, when you open a Finder window, you will be able to see hidden files and folders. To hide them again, simply repeat the above steps and uncheck the “Show hidden and system files” box.
Method 3: Use Keyboard Shortcuts to View Hidden Files
You can also use keyboard shortcuts to view hidden files on your Mac. Here’s how:

- Open Finder: Click on the Finder icon in the Dock to open it.
- Press the keyboard shortcut: Press the following keyboard shortcut to view hidden files in Finder:
Command + Shift + .- View hidden files: Once you’ve pressed the keyboard shortcut, you should be able to see hidden files and folders in Finder. To hide them again, simply press the same keyboard shortcut.
In conclusion, viewing hidden files on a Mac can be useful in various situations. Whether you prefer to use Terminal, a third-party app, or keyboard shortcuts, there are multiple ways to accomplish this task. However, keep in mind that some hidden files are hidden for a reason, so be cautious when modifying them and make sure you know what you’re doing.